Back to Home About Mango & Tomato Contact MePublicity & News Hire Me!Portfolio

8/30/12

Vegetarian Quinoa Salad Recipe: Eating Healthy Doesn't Mean Bland


Happy almost three day weekend! I can't wait to get some sleep, get a bit organized, cook, photograph, blog and just chill {and I just found out a friend will be in town!!!}. What are your plans?

Before I wish you a happy weekend, I thought I'd share a quick dish with you: Vegetarian Quinoa Salad Recipe. I suppose this could also be considered a side.

This is a no-recipe recipe.

Take cooked quinoa, add spinach, chopped tomatoes, chickpeas, black cured olives, red onions, drizzle of olive oil and salt and pepper. Mix. Serve.


Do you like quinoa? How do you use it in your cooking?

8/29/12

Steak Salad with Mangoes & Black Pepper Cashews


Here's a thing. Sometimes I don't plan my meals. In fact, I rarely plan my meals. This Steak Salad with Mangoes & Black Pepper Cashews is a perfect example of how some of my recipes/meal ideas come about.

As I've mentioned earlier, recently I received a box of mangoes from Mango.org. I made Moonshine Mango Boozer Popsicles with a few of them, ate some as is, and had another one sitting around. I also happened to have leftover steak and quinoa and a sample of Black Pepper Cashews from SunRidge Farms that the company sent to me {thank you!}. I decided to put these ingredients together to make a salad.


Steak Salad with Mangoes & Black Pepper Cashews

Ingredients

cooked quinoa
seared steak, sliced
mango, cubed
roasted peppers, chopped
drizzle of olive oil
SunRidge Farms All Natural Black Pepper Cashews, roughly chopped {or use whatever cashes you like}
basil, chopped


Directions

1. Place quinoa on a plate. Arrange steak, mangoes and red roasted peppers in a pretty pattern.
2. Drizzle with olive oil and top with nuts and basil.


VARIATIONS
rice instead of quinoa
chicken or shrimp instead of steak
any other herb instead of basil
pears instead of mangoes
pistachios instead of cashews

You see the point, right? This is just a template for a filling salad: base, protein, something sweet, something savory, herbs, oil and some crunch from the nuts. There are countless number of creations you can make!


Disclaimer: although I received mangoes and cashews as gifts, I was under no obligations to blog about them and was not compensated in any way

8/26/12

Sweet Potato & Corn Southwestern Soup: A Recipe For Any Season


This Sweet Potato & Corn Southwestern Soup: A Recipe For Any Season came about because of my laziness. I did not feel like going to the grocery store and opted to create a dish from the ingredients I already had in my refrigerator and freezer. Why is it perfect for any season? Well, right now you can use fresh corn, while in the winter frozen corn will be just fine. All you need to do is dice a few ingredients, saute them and then puree the soup. Easy enough, right? What are you waiting for? Go and make this Sweet Potato & Corn Southwestern Soup for lunch or dinner soon!

Sweet Potato & Corn Southwester Soup: A Recipe For Any Season

Ingredients

4 strips of bacon, sliced

2 sweet potatoes, peeled, diced

1 small red onion, diced

1 tablespoon Southwestern seasoning

salt & pepper

kernels from 2 corn

4 cups corn stock***

1 cup water

chopped cilantro

drizzle of chili olive oil

***To make corn stock: once you remove the kernels from the cob, put the cob into a pot, cover with water and let it bubble for a bit. Scrape any remaining corn bits from the cob into the stock, cool and then use right away or freeze in ice trays to use later.

Directions

1. In a hot soup pot, cook bacon until it has browned.

2. Add sweet potatoes and onions and saute for ten minutes.

3. Season with salt & pepper and Southwestern seasoning and add corn. Cook for five more minutes.

4. Add corn stock and water, bring to a boil, lower the heat and cook covered until potatoes are tender.

5. Puree the soup in several batches until perfectly smooth and serve drizzled with chili olive oil and topped with fresh cilantro.

VARIATION: Cook the bacon until crispy and remove it from the soup pot. Proceed with the recipe as is, but before pureeing the soup remove some of the sweet potatoes and corn.

Once you puree the rest of the soup, ladle it into a bowl and top with crispy bacon, sweet potato cubes and corn.

Of course you can make this recipe completely vegetarian by leaving out the bacon.


Are you ready for the cooler soup weather? What soup are you looking forward to cooking and/or eating?

8/24/12

Smoked Salmon Breakfast Sandwich


Happy Friday!!! Are you ready for the weekend? I am. No major plans other than a visit to a museum, maybe working on my build-your-own-sofa-table project, and of course cooking.

Most of the weekends I make something with eggs for breakfast, but this past weekend I made a Smoked Salmon Breakfast Sandwich. This is more of a how-to than an actual recipe. So follow along and make this very soon!

Salmon Breakfast Sandwich

Ingredients
olive bread, sliced, toasted
avocado
cilantro, chopped
salt & pepper
cucumber, sliced
red onion, sliced
smoked salmon

Directions

1. Mash an avocado with cilantro, salt and pepper and spread on toasted bread.
2. Top with cucumber slices, red onion slices and smoked salmon.
3. Eat.


I loved the crunchy texture of the toasted olive bread, cucumbers and red onion together with the creamy avocado and salmon. This was a pretty healthy and satisfying breakfast for sure.


What are you cooking/baking this weekend???

8/21/12

Potato Pesto Pizza Recipe & KitchenAid Food Processor Review

When you live alone in a condo, space is of importance: I try not to have too many kitchen appliances. The ones that I do have, I try to use to make sure they earn their keep {I'm talking about my ice cream maker and panini maker.}

My other favorite appliance is a dual blender and food processor. I bought it over five years ago because my mom told me to. Guess what? She was right: I love it. I can use it to make hummus, blend soups, crush ice, etc. Alas, over time, the mini food processor bowl started to show wear and tear. Plus, sometimes I wanted to make a recipe that would feed more than just me.

When I got a chance to receive and review KitchenAid's Food Processor, I was thrilled. I thought it'd be the answer to my needs. Not only does it have a large 13-cup capacity work bowl, but it also comes with a smaller 10-cup capacity bowl.

This past Sunday I decided to put the KitchenAid food processor through a test in my kitchen and use both of its bowls and two of its blades. But what to make!? I remembered I had a whole wheat pizza dough in the freezer and decided to come up with a recipe for Potato Pesto Pizza (say that ten times!).


Before I get to the recipe, here are my thoughts on the food processor {you can read the manufacturer's specifics yourself} 

  1. Unless you assemble your KitchenAid food processor properly, it will not work. Trust me, this is for your own good! Despite having two parents who are engineers, I hate reading directions. So it took me a few times before I figured out exactly how all the pieces fit.
  2. You can control how thick or thin you want to slice your vegetables by a leaver on the front of the machine. Brilliant!
  3.  This food processor is surprisingly quiet.
  4. I love that all the blades come in a container that hold them safely and neatly.
  5. I LOVE the shiny bright red color.
  6. I used both the large and the small bowl, the shredding and the slicing disk and the chopping blade and found all of them to be efficient!
  7. I can't wait to make more recipes using my new toy. Thank you, KitchenAid!
And now, it's time for Potato Pesto Pizza!

Potato Pesto Pizza

Ingredients
1 wholewheat pizza dough
3 hand fulls arugula
2 hand fulls spinach
1/4 cup oil
1/4 cup pine nuts
1 garlic clove
1/4-1/3 cup shredded Parmesan {I shredded mine in the food processor}
2 cups sliced potatoes, parboiled in salted water {make sure not to overcook them}
1/4 red onion, sliced
drizzle of olive oil
red pepper flakes, to taste  

Directions

1. Preheat the oven to 425.
2. Make pesto in your food processor by combining arugula, spinach, oil, pine nuts, garlic and Parmesan. Season with salt & pepper.


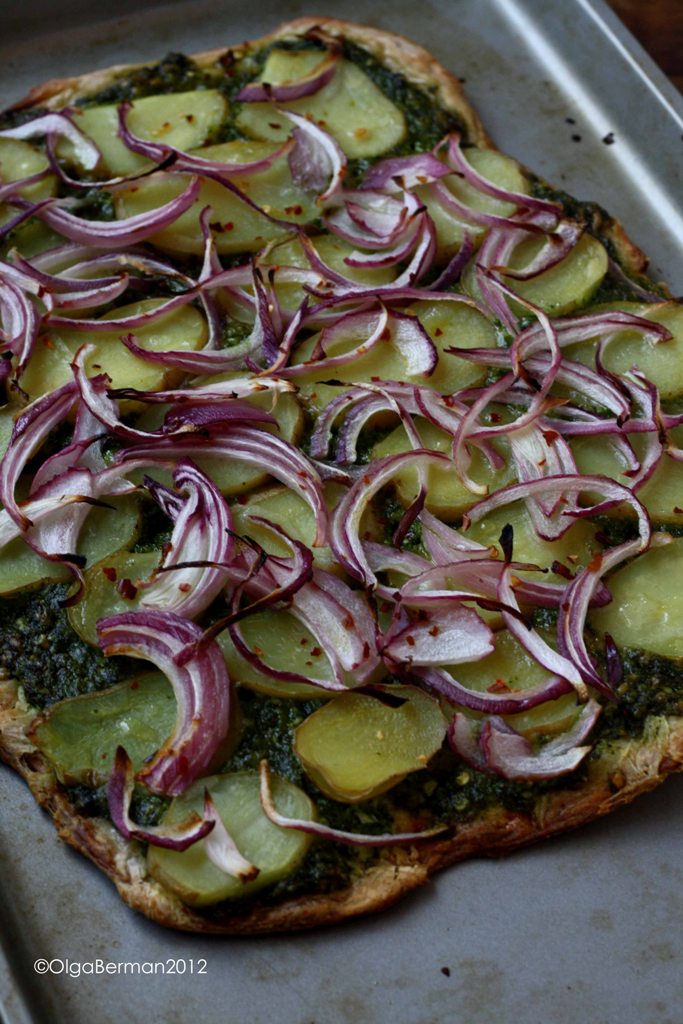
***check out the nice slices of potatoes and onions!***


3. Oil a cookie sheet and stretch your pizza dough into the shape you desire. I used a rectangle.
4. Spread the dough with your arugula/spinach pesto {you will have some left over!}, then add parboiled potatoes and red onions.
5. Drizzle the vegetables with oil and sprinkle with red pepper flakes.
6. Bake for about 40 minutes.


Because I parboiled the potatoes, they were completely tender. The pizza crust turned out crispy and the onions were nicely caramelized.

I sliced the pizza into squares and have enjoyed it for dinner reheated in a cast iron skillet and also for breakfast COLD!


Other things you can add: more Parmesan cheese on top (or try feta), sundried tomatoes, roasted peppers or olives. This is just a template for you to follow.


What's not to love about this carb-loaded pizza?

Disclaimer: KitchenAid sent me this food processor for a review. I was not compensated in any other way and not under any contract to write about it. All opinions are my own.

8/19/12

Warm Cauliflower Salad


Do you ever forget about your favorite dress, or a pair of earrings, or maybe your most comfortable pair of flats, only to rediscover and fall in love with it all over again?

It happens to me quite often, and not just with clothing and accessories. This past weekend, I rediscovered how much I love cauliflower.

Growing up, my dad used to boil cauliflower florettes, put them into an egg wash, drench them in bread crumbs and then pan fry them: amazing.

I've roasted cauliflower, made cauliflower soup and pan sauteed it with Indian spices and edamame.  I'm not going to go as far as to say that mashed cauliflower would replace mashed potatoes for me, but it's definitely a vegetable I enjoy.

How did this recipe for Warm Cauliflower Salad come about? Well, it was inspired by a recipe I read in Apron Anxiety. Alyssa's recipe was for a warm potato salad with mustard dressing.  I happened to have cauliflower in my refrigerator and switched out a few other ingredients to make this recipe my own. {Thank you, Mary, for letting me borrow the book!}


Warm Cauliflower Salad
Inspired by Apron Anxiety's Jennifer's Warm Potatoes with Mustard Recipe

Ingredients {2-4 portions}
1 head of cauliflower separated into florettes and cooked until tender in salted water {do not overcook!}
1 tablespoon Inglehoffer stone ground mustard {I discovered this mustard when I was visiting my parents in Seattle and completely fell for it. I had to buy it as soon as I got back to DC!}
1 tablespoon red wine vinegar
1/4 cup olive oil
salt & pepper
1 tablespoon capers
1-2 tablespoons thinly sliced red onions 


Directions
1. Drain the cauliflower and put it into a large salad bowl.
2. In a small bowl, whisk together the mustard, vinegar, olive oil, salt and pepper. Add to the cauliflower.
3. Add capers and red onions to the cauliflower and mustard dressing and gently combine.
4. Serve right away.
 

This is a great and easy-to-make side dish. If you manage not to eat the entire bowl right away, it is equally delicious the next day cold out of the refrigerator.


What is YOUR favorite dish that has cauliflower?

PS Big Thank You to my friend Nicole for creating a template in Photoshop that lets me add titles to my photos {see the top photo}. 

8/16/12

Summer Cooking: Pasta Primavera Recipe (Sort Of)


This post is one of my no-recipes-posts. It's just an idea for you to use when you need a bit of inspiration. Basically, it's a pasta dish with some sauteed vegetables, some raw vegetables and fresh herbs. Feel free to use whatever produce you have. Not a fan of pasta? Use rice or even boiled potatoes.

When I visited Butler's Orchards earlier this month, they gave me a basket of zucchini, peppers and patty squash from their farm. That's what I used in my Pasta Primavera.


Pasta Primavera

Ingredients
olive oil
zucchini, sliced
peppers, sliced
patty squash sliced
garlic, sliced
salt & pepper
chopped fresh tomatoes
cooked pasta
chopped fresh basil

Directions 
All you have to do is saute your vegetables in a bit of olive oil with garlic and salt and pepper. Then add fresh tomatoes, cooked pasta and fresh herbs: done!


What are some of your favorite no-recipes dishes?

Hope you all have a great weekend!

8/14/12

Easy Appetizer Idea: Nudo Olio D'Oliva Extra Vergine With Chillies Marinated Mozzarella Balls


Growing up, the only cooking oil my parents used was sunflower oil. It had a golden deep color with a rather fragrant scent. You are not going to find that type of sunflower oil at your local grocery store. Sorry. See if there is a Russian or Ukrainian store in your neighborhood and go there.

Although we had olives, which I used to hate as a little girl, we did not taste olive oil until we moved to the US. I'm pretty sure that in the very beginning we purchased whichever olive oil was on sale, but later we realized that the extra virgin olive oil that actually tasted good and was good for you was worth a few extra dollars.

Now that I'm all grown up and have a kitchen of my own {and LOVE olives}, I can't remember the last time I didn't have olive oil in my kitchen. I use it for sauteeing, dressing the salads or drizzling on top of dips.

When I received an email asking if I'd like to taste test

  • Nudo first press extra virgin olive oil
  • Extra virgin olive oil with Sicilian Chillies 
  • Extra virgin olive oil stone ground with fresh basil


I enjoyed the basil flavored olive oil drizzled on top of my tomato, mozzarella, and basil salad, but wanted to do something a bit more fun with the oil with chillies. Since I already had fresh mozzarella balls, I decided to marinate them. This recipe is incredibly easy, so do try it!

Nudo Olio D'Oliva Extra Vergine With Chillies Marinated Mozzarella Balls

Ingredients

10 mini mozzarella balls

2 garlic cloves, sliced

3 lemon slices

enough Nudo Olio D'Oliva Extra Vergine With Chillies to cover the mozzarella balls

extra red pepper flakes, optional

Directions

1. Place the mini mozzarella balls into a glass jar.

2. Add garlic and lemon slices to the mozzarella balls.

3. Cover everything with olive oil and add pepper flakes if you want even more heat.

4. Mix.

5. Refrigerate covered for at least a few hours.

6. Use these balls in salads or as an appetizer.


Note: the oil will most likely solidify while in the refrigerator. Do not freak out. It's completely fine. Just let the glass jar stand on your counter for about ten minutes before serving the mozzarella balls. Also, don't throw out the leftover marinate: use it in salads as dressing or for your next stir fry.


Do you have a favorite flavored olive oil?

Disclosure: I received a set of these oils as a gift from Nudo Italia, but was under no pressure to share my opinion with you. I just really liked the flavors and the packaging. I was not reimbursed in any way for this post.