Back to Home About Mango & Tomato Contact MePublicity & News Hire Me!Portfolio

8/29/13

Field Trip to Rappahannock Oysters

One of the things I ♥ most is sleeping in. That's what the weekends are for, right? Right! Unless, that is, there is a better offer ;)

A few weeks ago I was invited to join ten other food bloggers and media people on a day-long field trip to visit Rapphannock Oysters. And so I skipped my normal Friday night salsa dancing, set my alarm clock for 7 am (that's earlier than I wake up on my typical weekdays!), put on sunscreen, packed an extra set of clothes just in case I got soaked, and headed out to Union Market. That's where Ryan was awaiting with The Roadie and multiple boxes of food and beverages. We were going to be fed and hydrated amazingly well on this trip.

This is me drinking a mango mimosa (followed by a Bloody Mary) prepared by Gina Chersevani of Buffaloandbergen.com and eating bagel with cream cheese and lox.


Since the drive to the Rappahannock Oysters was more than two hours, we needed snacks. So there was plenty of cheese from Righteous Cheese and cured meats from Red Apron Butchery, not to mention bread from Lyon Bakery.

And then we got to the paradise. Seriously, the weather could not have been more perfect. It was slightly overcast and not at all humid for the DC area summer day. There was a bit of a breeze and the views of the water were so peaceful.

Stepping out of the The Roadie, we met owners and operators of Rappahannock Oysters Ryan and Travis Croxton, who happen to be cousins.
"Make Bay oysters consistently available, allow customers to once again appreciate the unique flavors of the Chesapeake Bay region, and sit back as the tide builds. For your part, the next time you order oysters, order them by name: Rappahannocks, Stingrays, Snow Hills, Olde Salts. And if the restaurant doesn't serve them - tell 'em to give us a call. Or order yours online!"

We saw how oysters grow and get sorted, and I even got to touch tiny oysters just a few weeks old! Don't worry, I did not eat those. 

"Today our oysters are grown "off bottom," positioned squarely in the water column where food quality and quantity are greatly improved. Not only do the oysters grow faster, they grow richer, plumper, and rounder - and all under our watchful eye. We monitor salt and temperature levels, guard against predators, cull out slow growers and misshapen shells - all to ensure that the customer gets a consistently healthy, attractive, and succulent oyster."


We also got to go out on a boat and see oysters on the line.

"Until the day they're ready to ship, our oysters are left feeding in the cool algae-rich waters, marinating in that perfect balance of minerals and brine to produce the unmistakable perfection that is the Bay oyster."

Everyone managed to stay inside the boat and dry ;)  In the photo above, Laetitia and I relax after our hard work (just kidding!).

And then it was time for lunch! I've had Rappahannock Oysters several times at their Union Market location (read about it here) and even cooked them in my own kitchen. This time, I got to try them at the Merroir.

Below are just some of the dishes we got to try out. I loved them all. It's really amazing how relaxing and almost magical it is to eat good food out in the fresh air by the water with fun people!


Above: tangerine beer, fresh oysters, and lamb & clams.
Below: shrimp, mozzarella/tomato salad, lamb sliders and scallops.


Oh, there there was more food: lamb with cous cous, crab cakes, and a s'mores donut!!!


On the drive back to DC there was iced tea from Pearl Teas and cupcakes from Curbside Cupcakes.

That was a long day full of so many wonderful memories!! I'm so lucky I get to participate in such events.

Special thank you to Ryan, Rappahannock Oysters, Union Market vendors, and Edens.

Disclosure: transportation and food was provided. I was not paid for this post: all opinions are my own. I've raved about Union Market since it opened up ;)

8/28/13

Kallari Chocolate & Red Currant Muffins


I love, love, love dark chocolate! A few months ago I received three bars of Kallari chocolate as a "try us out" and really liked these smooth, rich, and slightly bitter bars. I ate one of the bars as is, but decided to use another one in baking. I made Kallari Chocolate & Red Currant Muffins last month for brunch with my friends and they were quite a hit! Now I finally get to share the recipe with you.


"Kallari is committed to community viability and economic growth, through knowledge sharing, the preservation of Kichwa cultural traditions and natural resource conservation.

Kallari (Kahl-ya-di) is the Kichwa verb that means "to begin" or "to commence". Kallari also refers to the beginning times, or how our ancestors used to live. Our effort is a new beginning to empower future generations, meanwhile remembering the traditions of our Nation."
 

Kallari Chocolate & Red Currant Muffins
Makes 12
Slightly adapted from Nick Malgieri's Bake! 

Ingredients
2 cups all-purpose flour
1/2 cup sugar
1 tablespoon baking powder
1/4 teaspoon salt
8 tablespoons (1 stick) unsalted butter, melted and slightly cooled 
1 large egg
1 cup milk
2.46 ounce bar Kallari chocolate, roughly chopped {I used 75% cacao}
1/2 cup red currants
sugar in the raw for sprinkling

Directions
1. Set a rack in the middle of the oven and preheat to 375F.
2. In a medium bowl, mix the flour, sugar, baking powder, and salt.
3. In a different mixing bowl whisk the butter, egg and milk.
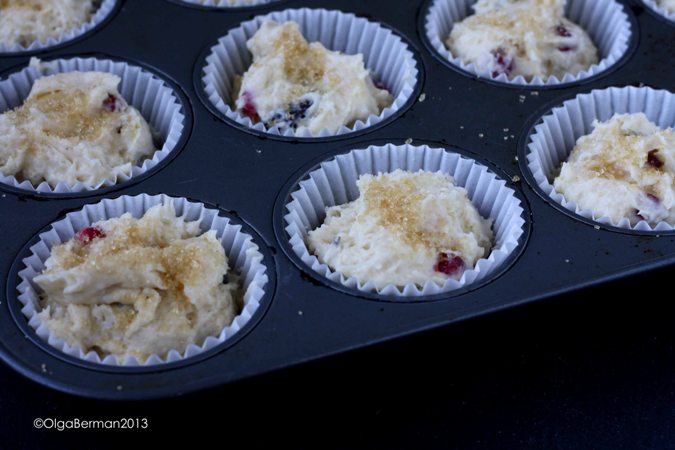
4. In several batches, incorporate the dry mixture into the wet mixture and then carefully fold in chocolate and red currants.


5. Divide the batter into a 12-muffin lined pan and sprinkle with sugar in the raw. Bake for about 20 minutes, or until a toothpick inserted into the muffin comes out dry.


Aren't these gorgeous? I loved the combination of sugary top with the slightly bitter chocolate and tart red currants. These also freeze great.


What's your favorite chocolate? Milk? Semisweet? Dark?

8/26/13

Carnation Berry Banana Smoothie: Real Seal


Earlier this month I was asked to create a recipe for Real® Seal with the theme of “Beat the Heat, End of Summer Treat.”

What's Real® Seal? Real Seal is something that was created by America's Dairy Farmers more than 30 years ago to separate products that follow specific guidelines for processing and manufacturing. The products are registered and follow the required standards and are "made entirely with the wholesome goodness of U.S. - produced cow's milk." For more information, check out the Real Seal Facebook page.

You can also help out in choosing a name for the Real Seal character!!! Send your suggestions by August 31st.  

The only product with Real Seal I could find at my grocery store was the Nestle Carnation Evaporated milk. Since I don't always have fresh refrigerated milk on hand, I thought a can of milk would be a fun item to experiment with. And what's better on a hot summer day than a slightly sweet, fast-to-make, and actually good-for-you smoothie? That's how I decided to make Carnation Berry Banana Smoothie.


Carnation Berry Banana Smoothie
Serves 2 small children or 1 adult

Ingredients
1/2 cup frozen sliced banana
1/2 cup frozen blueberries
1/2 cup frozen raspberries
1/4 cup shredded coconut
6 ounces Nestle Carnation Evaporated milk

optional: sugar or any other sweetener
fresh berries and extra shredded coconut for garnish
 

Directions

1. In a blender puree the frozen fruit with shredded coconut and evaporated milk. Add sweetener if your berries are not sweet enough.
2. Pour into glasses.
3. Garnish with fresh berries and extra shredded coconut. {I used a straw for the photos because they are pretty, but you'll be better off eating this with a spoon!}


Have you seen Real Seal products in your grocery store? Have you cooked from them?

Disclosure: I was provided with a gift card to cover my time and ingredients. All opinions are my own.

8/21/13

Summer Zucchini Soup Recipe Inspired by Dinner at Ambar Restaurant in DC


Earlier this month I was invited to try out the menu at the Balkan restaurant called Ambar in the Eastern Market neighborhood of DC. I asked my friend Evi to be my +1, and we put ourselves in the hands of the chef. Sometimes it's nice to surrender control and let someone else be in charge.

We enjoyed the view from the second floor of the restaurants and sipped on our beverages of choice: Evi had a glass of Serbian red wine, and I had a mango cocktail (of course!). I was surprised that out of all the dishes we tried, I liked the vegetarian ones the most. Those dishes included a cold zucchini soup and cheese pies. I liked the zucchini soup so much, I decided to recreate it in my own kitchen.

Summer Zucchini Soup Recipe Inspired by Dinner at Ambar Restaurant in DC
Serves 6

Ingredients
2 teaspoons olive oil
1 large Russet potato, peeled, diced
1 white onion, diced
3 zucchini, diced
salt
32 ounces low fat chicken stock
heavy cream to taste

garnish
6 sundried tomatoes, chopped
drizzle of the oil from sundried tomatoes
chopped fresh basil

Directions

1. Heat the olive oil in a soup pot. Add potatoes and saute for 5 minutes.
2. Add diced onion and zucchini, season with salt and saute for 5 more minutes.


3. Cover the vegetables with the chicken stock, bring to a boil, lower the heat, and simmer covered until the vegetables are completely tender.

4. Using a stick blender, puree the soup, adding a few splashes of heavy cream at the end. Check for seasoning.

{check out my new ladle!!!}

5. Let the soup cool down, and then chill it in the refrigerator for at least a few hours.
6. Serve topped with chopped sundried tomatoes, a drizzle of oil and fresh basil.


I think I did a pretty good job replicating the soup from Ambar. I liked it so much, I even ate it for breakfast a few times ;)


Of course you can serve this soup hot or at room temperature. This is a great way to use up all your summer zucchini!

What do you cook with your zucchini?

8/18/13

Swiss Chard and Spinach Ravioli Nudi: Cookbook Dinner Club (The Glorious Vegetables of Italy)


For this month's cookbook dinner club, which actually happened to be a lunch, my friends Cecilia and Julia and I were lucky recipients of Domenica Marchetti's latest cookbook The Glorious Vegetables of Italy. We received the preview copies from the publisher, Chronicle Books.

This is the third cookbook by Domenica in my collection, and not only do I know Domenica, I am also really happy and proud that the author photo used in the book is the one that I took!

Just like other books by Domenica, this cookbook has gorgeous photographs, thoughtful stories, and recipes that beg to be made. Although I typically don't read the introductory chapters of a cookbook, because I didn't have any fiction books to read, I actually read the chapter describing different vegetables and how to pick and prepare them. Read that chapter! You'll learn a lot and get little stories from Domenica's and her family's life.

As the title of this cookbook implies, you'll get a varied collection of recipes in which vegetables shine, but you'll also get a few dishes that feature meat, preserves, and of course no cookbook complete without a few desserts.

For my contribution to the cookbook dinner (lunch) get together, I made Domenica's Swiss Chard and Spinach Ravioli Nudi.


Swiss Chard and Spinach Ravioli Nudi
Reprinted with the permission from Chronicle Books

Ingredients
makes 4-6 servings

1 lb/455 g Swiss chard, stems removed and reserved for another use
8 oz/225 g fresh shee's milk or well-drained cow's milk ricotta cheese
fine sea salt
freshly ground black pepper
pinch of freshly grated nutmeg {I left this out}
3/4 cup/85 g freshly grated Parmigiano-Reggiano cheese, plus more for serving
2 large egg yolks, lightly beaten
1/4 cup/30 g flour, plus more for coating the nudi
3 cups/720 g fresh tomato sauce, simple tomato sauce, or small-batch tomato sauce, heated to a simmer {Cecilia made and brought over the fresh tomato sauce from Domenica's cookbook and it was amazing.}

Directions

Rinse the shredded chard leaves in cold water. Place the leaves, with the water still clinging to them, into a large saucepan, cover, and set the pan over medium heat. Cook the chard, tossing it from time to time, for 12-15 minutes, until tender and most of the water has evaporated. Turn off the heat, and using tongs, transfer the chard to a collander and let it cool. Rinse out the saucepan and return to the stove.

Repeat with the spinach, but only cook it for about 5 minutes.

When the greens are cool enough to handle, squeeze as much excess water from them as you can. Transfer them to a cutting board and chop finely. You should end up with about 1 packed cup of freshly chopped greens weighing between 7 and 8 oz/200 and 225 g. 

Place the greens in a large bowl and add the ricotta, 1/2 tsp salt, a generous grinding of pepper, the nutmeg, the Parmigiano, and the egg yolks, Mix together gently but thoroughly. Sprinkle in the flour, and gently fold into the mixture.  


Pour some flour into a small shallow bowl. Have ready a large rimmed baking sheet lined with waxed paper or dusted with flour. {Domenica said to use your hands to make the bowls, but I used a little ice cream/cookie dough scoop to make sure every ball was uniform, and then rolled them.} Once the nudi are formed, roll them in the flour, and set it on the baking sheet. Work in batches. 


Bring a large pot of water to a boil over high heat and salt generously. Carefully drop in 8 to 10 nudi. Within 1 or 2 minutes, they will begin to float to the surface. Continue to cook the nudi for another 5 to 6 minutes, until they have floated to the surface and are puffed up. With a large simmer, removed the nudi and transfer them to a warmed serving bowl. Spoon about 1 cup of the tomato sauce over the nudi and mix very gently. Continue to cook the nudi until you have cooked them all. When they have all been added to the serving bowl, spoon additional sauce over the top and sprinkle with Parimgiano. Serve immediately.


I was a bit scared of making this dish, but it was really easy. The only time consuming part was rolling the nudi. Tender, cheesy, slightly green, and dipped into tomato sauce, these balls were delicious! Plus, it's almost like they are healthy because of all the chard and spinach ;)

Cecilia made tomato sauce for this recipe and also a take on Domenica's Winter Squash Panna Cotta. Julia made Chickpea Salad with Red Onions and Lemon Zest and Tuscan Kale Frittata.

We had quite a feast! Later on I will share a Warm Citrus-Scented Olives with Ricotta Salata I made for an appetizer.

I have at least 4 other recipes that I have marked that I'd like to make from Domenica's The Glorious Vegetables of Italy. I highly recommend you add this cookbook to your collection.

8/14/13

How to Cook Steak? Check out The Book of Steak + Steak Sandwich Recipe


I hate, hate, hate, HATE the word veggies. I mean, for god's sakes, vegetables, doesn't take that much longer to say. Even I can pronounce that word..and English isn't my native language.

Ok. I feel better.

Although I hate the word veggies, I love vegetables. Salads, soups, sides, and appetizers can be made with a wide variety of vegetables, and although tomatoes are technically fruit, I can eat them by a bucket and they are my favorite vegetable.

Still, despite my love for vegetables, there is no way I'll ever be willing to give up meat. Pork (even though I'm Jewish) is amazing slowly cooked and shredded, and please don't forget bacon. Chicken is good too, but I guess it's poultry. And then there's beef. Medium rare juicy burgers with melted cheese, chipotle mayonnaise and perfectly ripe avocados. Beef fajitas with onions and peppers. Medium rare steak with sauteed mushrooms and onions. I even love meatloaf!
I'm getting hungry just typing this.

I'm good at making meatballs and meatloaf: anything with ground beef. But when it comes to cooking a whole piece of steak....well, I could use some help.

That's why when I got a chance to receive a preview copy of The Book of Steak from Parragon Book’s Love Food line, I said BRING IT!

The book is great: each recipe is less than a page, the photos are gorgeous and make you really hungry, the directions are succinct and numbered. By reading the book, you can learn about different cuts of meat, how to buy meat, how to cook different cuts of meat, and what condiments and sides to serve with your meat.

I also really love the typography used in the book: it is fresh, appealing, and cool.


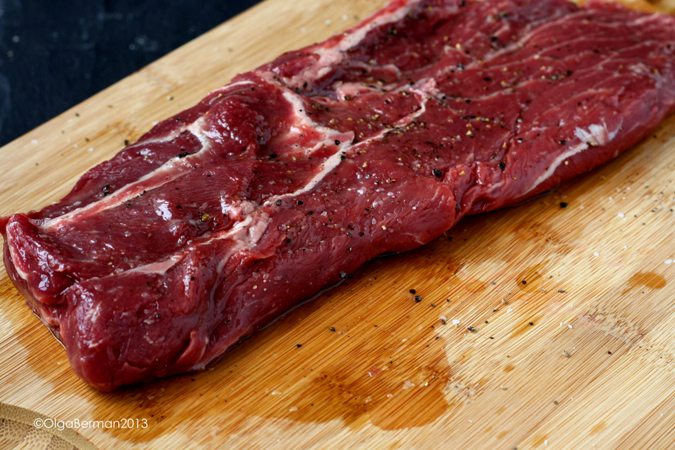
For my first recipe I decided to make Flat Iron Steak with lemon and basil pesto and turn it into a sandwich.  It was a total success! {And if you happen to be a vegetarian and are still reading this post, MAKE THE PESTO!}

Flat Iron Steak with lemon and basil pesto
Ingredients
4 flat iron steaks, 12 ounces each
2 tablespoons olive oil
1 teaspoon salt
1 teaspoon pepper

for the pesto
2 garlic cloves, crushed
zest of 2 lemons
3/4 cups pine nutes
1 cup freshly grated Parmesan cheese
1/4 cup extra virgin olive oil
1 large bunch basil
1/2 teaspoon salt
1 teaspoon pepper

for the sandwich
ciabatta, sliced, toasted
sliced tomatoes


Directions
1. Place the steaks on a large cutting board, rub with the olive oil, and season with the salt and pepper.
2. Preheat a ridged grill pan over high heat and cook the steaks for 5 minutes on each side for medium-rare, or until cooked to your liking. Cook the steaks in batches, if necessary. Set aside to rest for 5 minutes before serving.
3. Meanwhile, place all of the pesto ingredients in a mortar and pestle and crush to a coarse paste. Alternatively, process in a food processor or blender to achieve the desired consistency.


To assemble the sandwich, spread lemon basil pesto on both sides of the toasted ciabatta, top with sliced steak and sliced tomatoes and EAT.


Doesn't this look good and meaty? :)


This was a really great sandwich and I used the leftover of the pesto in pasta, spread on toast to serve with sausage, pepper and mushroom frittata, and mixed into a tuna salad.

I can't wait to try more recipes from the book!

What's YOUR favorite cut of meat and how do YOU cook it?

8/12/13

Perfect One Pot Brunch Dish: Turkey, Pepper & Mushroom Frittata


I believe in low key, easy entertainment: a few simple dishes, a few contributions from my guests, fresh flowers, casual plates and glasses, and a lot of catching up and chatter.

A few weeks ago when I had two friends over for brunch at my condo, I decided to make an antipasto platter as an appetizer, dark chocolate and red currant muffins as dessert and something with eggs as a main course.

At first I thought about making  breakfast casserole with eggs, bread, sausage and vegetables, but then settled on a frittata served with toast. Below is my creation.

Perfect One Pot Brunch Dish: Turkey, Pepper & Mushroom Frittata
Serves 4-6

Ingredients
olive oil
3 Italian styled uncooked turkey sausages, removed from their casings
1 green pepper, sliced
1 red pepper sliced
8 ounces cremini mushrooms, stems removed, caps sliced
1 white onion, sliced
salt & pepper
8 eggs
1/4 cup milk
1/3 cup shredded Parmesan

Directions
1. Preheat the oven to 375F.
2. Heat a bit of olive oil in an oven-safe skillet (I used Le Creuset I found on sale at Marshalls).
3. Add the Italian sausages and cook until they are brown, breaking them into bite-size pieces. Remove from the pan.
4. If necessary, add a bit more oil to the pan. Add peppers, mushrooms and onions and season with salt and pepper. Cook the vegetables until they are tender, but not completely soft.
5. Add the browned sausage back into the pan.


6. In a bowl, whisk together the eggs, milk and cheese. Pour over the sausage/vegetable mixture.


7. Put the pan into the oven and bake for 20 minutes uncovered.
8. Let the frittata sit for 5 minutes out of the oven before cutting into it.


Serve with toast and lemon basil pesto.


If you have some of this frittata left over, it's great at room temperature for breakfast the next day or as lunch with a big salad.

What do YOU like to cook for brunch when you friends over?

PS I will share recipes for the dark chocolate and red currant muffins AND for the lemon basil pesto in the next few weeks. 

8/9/13

Asian Grilled Eggplant with Black Bean Paste & Ginger


I ♥ eggplant. I use it to make dips, marinated salads, casseroles and even bahn mi sandwiches. A few weeks ago I had a random eggplant sitting in my refrigerator and a craving for something spicy, saucy and grilled. That's how I ended up creating Asian Grilled Eggplant with Black Bean Paste & Ginger recipe.

Asian Grilled Eggplant with Black Bean Paste & Ginger
Serves about 4

Ingredients
vegetable oil
1 large eggplant, sliced into 1/4"

for the sauce
3 tablespoons freshly microplane'd ginger
3 tablespoons Hoisin sauce
3 tablespoons black bean paste
3 teaspoons toasted sesame oil
3 pinches red pepper flakes
3 teaspoons soy sauce

toppings
chopped basil
toasted sesame seeds


Directions
1. Heat your panini maker or your grill.
2. Brush eggplant slices with oil on both sides and cook in the panini maker for 2-3 minutes. If using a skillet, cook the eggplant 2-3 minutes on each side.


3. Meanwhile, in a small bowl combine all the ingredients for the sauce.
4. Remove the eggplant slices from the panini maker and brush with the sauce on both sides.
5. Cook the sauce'd eggplant slices in the panini maker for 2-3 more minutes.
6. Serve these Asian Grilled Eggplant with Black Bean Paste & Ginger disks topped with freshly chopped basil and sprinkled with toasted sesame seeds.


This is a great dish to serve as an appetizer or a main course with rice and grilled chicken.


Have a great weekend!