Back to Home About Mango & Tomato Contact MePublicity & News Hire Me!Portfolio

6/28/21

How To Make Creme Brulee In A Pressure Cooker

2 mini creme brulee desserts in Le Creuset with blueberries

A few weekends ago I made my first ever dessert in a pressure cooker and my first ever creme brulee all thanks to a review copy of Lauren Keating's Instant Pot Cookbook For Beginners

I've had my pressure cooker for at least 3 years, but have only used it for savory recipes. The idea of making a dessert in a pressure cooker, especially in the hot summer months, was enticing. I was also curious whether Lauren's simple recipe would be as good as the dessert I occasionally order in restaurants. It was!!!

In fact, the dessert was so great, I'm glad I only made a third of the recipe (enough for 2 portions) and shared one with a friend: otherwise I'd eat it all in just a few days. Since then, I've ordered a professional torch to brulee the sugar directly instead of putting the mini desserts under the broiler.

Lauren's book covers the basics of pressure cooking and provides recipes for each meal of the day, dessert included.

Reprinted with permission.

Cooking creme brulee under pressure ensures it comes out perfectly creamy and evenly cooked every time. Be sure to plan ahead, since this will need to chill for at least 4 hours before serving. 

Creme Brulee

Serves 6

Ingredients

6 tablespoons granulated sugar, plus 4 1/2 teaspoons, for topping

6 large egg yolks

2 cups heavy (whipping) cream

1 1/2 teaspoons vanilla extract

1/8 teaspoon salt

Directions

1. In a medium bowl, whisk together 6 tablespoons of sugar and the egg yolks. While whisking constantly, add the cream, vanilla, and salt. Pour the mixture through a fine-mesh strainer.

2. Divide and fill six 6-ounce ramekins three-fourths full and then remove any air bubbles with the back of a spoon. Cover each ramekin tightly with aluminum foil.

3. Set the trivet in the inner pot and pour in 1 cup of water. Place 4 ramekins on the trivet and stack the remaining 2 on top.

4. Lock the lid on the pressure cooker. Set the pressure valve to seal and cook for 10 minutes on manual low pressure. When the time is up, allow for 15-minutes natural release of pressure; then quick release any remaining pressure.

5. Carefully transfer the ramekins to a baking sheet and let cool at room temperature for 30 minutes. Refrigerate until chilled, at least 4 hours and up to overnight.

6. Spread 3/4 teaspoon of sugar evenly on top of each cooked creme brulee. Use a kitchen torch to caramelize the sugar and make a crispy top. Let them sit for 5 minutes before serving. 

8/3/20

Garlic Lemon Green Beans From Hemsley Hemsley


green beans, garlic, lemon, side dish, vegetables

Last week I received a surprise cookbook in my latest produce order from Washington's Green Grocer! After being a trusted customer for over 6 years, this was such a sweet gesture.

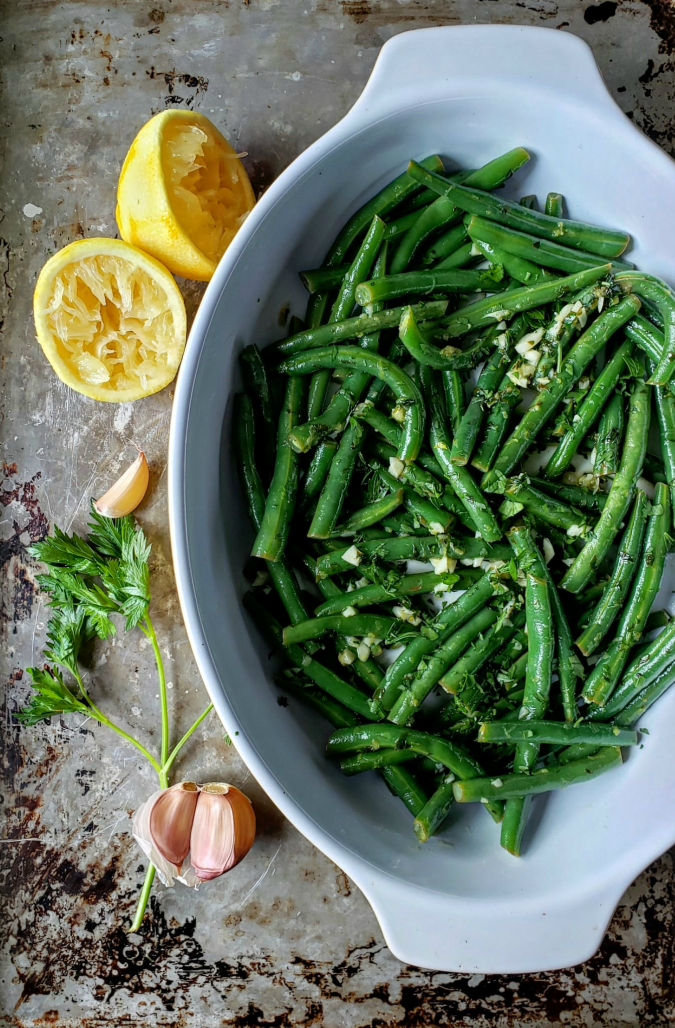
Looking through Hemsley Hemsley cookbook, I immediately flagged a recipe for Garlic Lemon Green Beans and made it over the weekend.

You basically steam the green beans while heating ghee (I used olive oil) with chopped garlic, lemon zest and lemon juice, and fresh parsley. Once the beans are tender, drain and add them to the "bath" and seasons with salt and pepper. Top with parsley. 

I highly recommend doubling the recipe because it's great reheated in a skillet the next day.

cabbage, peaches, cookbook, hemsley hemsley, produce, corn, green beans

4/27/20

Quarantine Roasted Tomato & Pepper Soup Adapted From Cool Beans


Over the weekend I adapted Joe Yonan's recipe from Cool Beans for Roasted Tomato and Pepper Soup.

I won Joe's cookbook from the food chat on Washington Post, and have already made his Garlicky Great Northern Beans and Broccoli Rabe Over Toast recipe a month or so ago.

The Roasted Tomato and Pepper Soup is an easy to follow recipe with pretty standard ingredients, but I did not want to use my fresh tomatoes and did not have fresh peppers. What I did have, however, were cans of tomatoes and a jar of roasted peppers. That's what I ended up using. The benefit of starting with canned tomatoes is that you can make this soup any time of the year: even when tomatoes are not in season.

The key to using canned tomatoes is to drain them incredibly well (I drank the liquid) and then roasting tomatoes in the oven.

Quarantine Roasted Tomato & Pepper Soup Adapted From Cool Beans

Serves 4

Ingredients

28 ounce canned diced tomatoes, drained well
14.5 ounce canned diced tomatoes, drained well
olive oil
1 onion, chopped
6 garlic cloves, chopped
2 jarred roasted peppers, chopped
3 cups liquid**
salt & pepper to taste
1 handful basil leaves, more to garnish
2 cups cooked beans (I used Great Northern beans)
optional: sugar
chili oil
challah

** use a combination of liquid from the beans (I cooked mine in the pressure cooker) and water or vegetable broth

Directions

1. Preheat the oven to 500F. Line a cookie sheet with aluminum foil. Spread drained diced tomatoes in a single layer, drizzle with olive oil, and roast for 20 minutes.
2. Meanwhile, in a large soup pot, add olive oil and heat. Add onion and garlic, and saute till tender. Do not burn.
3. Add roasted tomatoes and peppers to the onions and garlic. Season with salt & pepper. 
4. Add the liquid, bring to a boil, lower the heat, and simmer for 10 minutes.
5. Add basil. Using an immersion blender, carefully blend the soup to the consistency you desire.
6. Add the beans and heat through. Add a pinch of sugar if needed.
7. Serve the soup drizzled with chili oil and a few fresh basil leaves. Challah toast is a great accompaniment!

I loved the natural sweetness of tomatoes that came through after roasting them in the oven paired with the chili oil. This soup can be an excellent sauce (do not add beans) for meatballs or a base for shakshuka!

3/11/20

Chocolate Pecan Babka


For years I've wanted to make babka, a dessert made from an egg yolk rich yeasty dough with a chocolate filling, but every time I looked at a recipe, I decided it was too complicated.

It all changed this past weekend when I played a sous baker (is that a thing) and learned how to make a Chocolate Pecan Babka using Peter Reinhart's recipe in the Artisan Breads Every Day. You can see the recipe here

Yes, there were quite a few steps in this recipe and some waiting time, but overall it was pretty straight forward.

The one mishap involved going back to the grocery store to pick up all purpose flour because the accidentally purchased bread flour would not have worked.

I wish you could smell the dough! It had a sweet aroma even before the addition of the semisweet chocolate.

The recipe called for cinnamon, but if you know me, you know how I feel about it. Instead, I suggest using chopped pecans. You can of course use both.


The dough was incredibly easy to roll out. 

Don't skip the streusel topping made from flour, butter, brown sugar, and a pinch of salt. It added an extra crunch to the final product (not pictured below).


I think the babka tasted better the next day after all the flavors had a chance to mingle together. It would be fun to add orange zest to either the dough or the filling because orange and chocolate play well together!

2/24/20

Beans & Kale Toast Adapted From Joe Yonan's Cool Beans Cookbook


A few weeks ago I won a copy of Joe Yonan's latest cookbook with a super fun title: Cool Beans.

I grew up eating my mom's white bean, carrot, and beef soup as well as her split pea soup. I then fell in love with hummus, Indian red lentils, French black lentils, and crispy chickpeas.

A cookbook about beans, then, is a welcomed addition to my bookshelf for sure!

The recipe that stood out to me both for its simplicity and its beauty was Garlicky Great Northern Beans And Broccoli Rabe Over Toast.

But................I did not have broccoli rabe, nor did I have the right beans. I decided to reinterpret Joe's recipe using curly kale and the white'ish variety of beans I had in my cupboard.

I soaked the beans according to Joe's instructions and then cooked them in a pressure cooker using two ingredients I would have never paired with beans: whole cloves and kombu (dried seaweed). Special shout out to my friend Sylvie for buying kombu for me.

The cloves and kombu gave a deep earthy flavor to the beans, but you would not be able to identify them without knowing they were there (a good thing in my book).

The rest of the recipe came together quickly: saute the kale in olive oil, add garlic, salt and pepper, and cooked beans with some of the liquid. Top toasted sourdough bread with the kale/bean mixture, drizzle with chili oil, and top with grated Parmesan.

I added a squeeze of Meyer lemon and a sprinkle of Korean chili flakes to my toast to brighten the flavors. 

What a beauty! Leftovers are great as lunch with a baked sweet potato or turned into an omelet.

12/2/19

Flourless Chocolate Chili Cake: The New Way to Cake by Benjamina Ebuehi


You know how they say not to cook/bake something new for a party? Well, I did. Sort of. After receiving a preview copy of Benjamina Ebuiehi's The New Way to Cake book, I decided to make her Flourless Chocolate Chili Cake for Thanksgiving at my friend Jazmin's house.

I've made several versions of flourless chocolate cakes in the past quite successfully, so wasn't worried about this cake failing. In fact, this recipe was by far the easiest because it did not require using a double boiler or separating the eggs to whip the whites.

The chili powder gives a great kick to this rich and decadent cake. I recommend serving it with a scoop of vanilla ice cream. Everyone loved this cake. Even a 4 year old!

Reprinted with permission from The New Way to Cake by Benjamina Ebuehi, Page Street Publishing Co. 2019.


FLOURLESS CHOCOLATE CHILI CAKE

This cake was inspired by the popular Swedish kladdkaka, which translates as “sticky cake.” We deliberately underbake this to give it the characteristically gooey interior, and as it cools, it naturally sinks and produces the most beautiful cracks. 

If you’re someone who struggles with making a cake look “perfect,” this is the one for you. The warming heat that comes from the cayenne pepper lingers just long enough to leave you wanting more.

Yield:
1 round 8-inch (20-cm) cake

3/4 cup plus 1 tbsp (190 g) unsalted butter
2 cups (190 g) 70% dark chocolate
1 tsp cayenne pepper powder
Scant 1/3 cup (75 ml) espresso or strong coffee, cooled
1/2 tsp vanilla extract
3 eggs
2/3 cup (135 g) superfine/caster sugar
1/2 tsp flaky sea salt
2 tbsp (10 g) cocoa powder, to dust

Preheat the oven to 350°F (180°C). Grease a springform or loose-bottomed 8-inch (20-cm) cake pan and line the bottom with parchment paper.

Melt the butter, chocolate and cayenne pepper in a small saucepan. 

Once the chocolate has melted, remove from the heat and stir in the coffee and vanilla. Let it cool. 

Using a stand mixer or electric whisk, whisk together the eggs and sugar for 3 to 5 minutes, or until thick, pale and fluffy. 

Pour the chocolate mixture into the eggs, add the salt and fold gently to combine. 

Pour the batter into the prepared pan and bake for 40 to 45 minutes, or until the cake is just baked with a slight wobble in the middle.

Remove from the oven and allow the cake to cool completely. As it cools, the surface will crack, and this is what we want! 

Use a small sieve to dust generously with cocoa powder before serving.


I'm looking forward to trying other recipes from this gorgeous book!

11/8/19

Melted Green Cabbage from Sababa Cookbook


How do you elevate one of the least expensive and somewhat blend vegetables available in a store? Well, Adeena Sussman figured it out and shared her recipe with everyone in her cookbook, Sababa

After following Adeena on instagram and seeing her repost photos of people making her Melted Green Cabbage recipe, I decided to make it too. 

I used leftover 1/2 of a cabbage I had after making borsch last week. This meant using a smaller skillet and reducing the amounts of other ingredients. I browned wedges of cabbage in olive oil, then added garlic cloves and shallots, white wine and chicken broth, thyme, and then roasted for 2 hours in the oven!

Because I did not brown my cabbage long enough, I broiled it: not a huge deal. I finished the dish with sour cream and forgone the butter.

If I say so myself, the final results are gorgeous! 

10/28/19

Zucchini, Dill, and Feta Shakshuka from Sababa by Adeena Sussman


Breakfast for dinner? Meatless Monday? Comfort food? Adeena Sussman's recipe for Zucchini, Dill, and Feta Shakshuka perfectly fits all three categories.

Earlier this month, I won Adeena Sussman's Cookbook Sababa (published by Avery) on instagram from Ellie Krieger, and decided to make Adeena's shakshuka recipe yesterday for brunch with friends.

I've made my own version of shakshuka many times before, but thought I could learn a thing or two from a published cookbook author. 

What I learned is that I've never spent nearly enough time perfecting the sauce by sauteing the aromatics, layering the spices, using 3 types of tomatoes (raw, pureed from a can, and tomato paste), and reducing the sauce to make a flavorful and thick base for the eggs.

Adeena's shakshuka was a great success at brunch, and I had leftovers today for lunch. I am looking forward to making her green shakshuka next!

Zucchini, Dill, and Feta Shakshuka
Reprinted with permission from the author
Serves 4

1/4 cup extra-virgin olive oil, plus more for drizziling
1 medium zucchini, thinly sliced into rounds
Kosher salt and freshly ground black pepper to taste
1 medium onion, finely diced
1 large red bell pepper, seeded and chopped
3 large garlic cloves, thinly sliced
3 tablespoons tomato paste
1 teaspoon ground cumin
1 teaspoon sweet paprika
1 teaspoon ground coriander
1/4 teaspoon cayenne pepper, or more to taste
6 medium very ripe fresh tomatoes, finely chopped by hand, or pureed in the bowl of a food processor if you like smoother shakshuka
One 14.5-ounce can crushed tomatoes
1 small, fresh, finely diced red jalapeno, plus more to taste and for serving
1/4 cup chopped fresh dill, plus more for garnish
6 large eggs
1 cup (4 ounces) crumbled feta cheese
Pita or other bread, for serving

Set a rack in the top third of the oven. Heat 2 tablespoons of the olive oil in a large oven-safe skillet over medium-high heat. Add the zucchini, season in the pan with salt and black pepper, and cook, not stirring too much, until the zucchini has released its water and is golden and slightly charred around the edges, 3 to 4 minutes per side. Transfer to a plate.

Add the remaining 2 tablespoons oil to the skillet, then add the onion and bell pepper and cook, stirring, until the onion is lightly golden and softened but not too dark, 9 to 10 minutes. Add the garlic and cook 1 more minute. Add the tomato paste, cumin, paprika, coriander, and cayenne and cook, stirring, until the mixture is fragrant and the tomato paste is slightly caramelized, 2 minutes. Add the fresh tomatoes, canned tomatoes, and jalapeno. Bring to a boil, then reduce the heat to a simmer and cook until the sauce has darkened and thickened slightly, 20 to 25 minutes; season with additional salt and black pepper to taste.

Preheat the broiler during the last 5 minutes of cooking.

Stir in the dill and return the zucchini to the pan, stirring gently. Use a spoon to form 6 wells in the sauce, crack an egg into each well. Sprinkle with feta around the skillet and cook for 3 minutes. Transfer the shakshuka to the oven and broil until the top of the sauce is slightly caramelized and the whites of the eggs are just opaque but the yolks are still runny, 2 to 3 minutes. Remove from the oven (use an oven mitt since the handle will be hot), top with fresh chopped dill and more jalapeno, and serve immediately, or cool to room temperature and serve, sandwich-style, stuffed into pitas or piled on top of bread.

NOTES
1. I used orange pepper because that's what I had.
2. I did not add dill into the sauce itself: only used it as a garnish.
3. I used room temperature eggs as to not shock them too much ;)

12/12/18

Bulgur Winter Salad With Preserved Butternut Squash, Cotija, And Smoked Almonds


If you think salads are only for hot-weather months, think again. Bulgur Winter Salad With Preserved Butternut Squash, Cotija, And Smoked Almonds is bursting with color and a combination of sweet, salty, and crunchy flavors that will make the winter blues go away if only for a short while.

A few months ago I took Domenica Marchetti's workshop to learn about preserving. One of the recipes surprised me: did you ever consider preserving butternut squash!? Neither have I, but Domenica was correct: preserved squash is such a fun and unexpected idea. The squash retains its gorgeous orange color and crispy texture and is paired with mint and dried chili peppers. 

You can find the recipe for the squash here, or in Domenica's Preserving Italy book. 


In Preserving Italy Domenica shares a recipe for Farro Salad With Preserved Winter Squash And Dried Cherries, which I adapted and simplified to fit my tastes and the contents of my refrigerator and pantry. I used bulgur instead of farro, smoked almonds instead of hazelnuts, cotija instead of ricotta salata, and left out honey and vinegar.

Bulgur Winter Salad With Preserved Butternut Squash, Cotija, And Smoked Almonds

Ingredients
arugular
cooked bulgur
dried cherries
thinly sliced shallot
preserved butternut squash
cotija, crumbled
olive oil
salt to taste
smoked almonds, chopped

Directions
Layer ingredients on a plate or mix in a bowl.

11/6/18

Radicchio & Roasted Squash Salad from Now & Again Cookbook from Julia Turshen


Thanksgiving is a few weeks away and maybe you've already started planning your menu, or maybe just like me you have a few butternut squashes sitting around and are looking for a fun recipe to make with them.

Either way, the Radicchio & Roasted Squash Salad from Julia Turshen's Now & Again Cookbook is a great way to use your butternut squash. My friends at OXO sent me a copy of Julia's book and a few kitchen tools. 

The book is divided into seasons and presents menus and recipes based on special occasions for each. If you, like me, love leftovers, Julia provides plenty of ideas for those too. 

If you've read my blog, you know I love oxo tools. One of my favorites is the angled measuring cup. I had the 2 cup capacity cup and am happy to add the mini one to my collection (see the photo below). I used the cup to measure 4 tablespoons of vinegar for the dressing in the recipe, which equals 1/4 cup.

I have many peelers, but this new one from oxo has a great grip, is light weight, has a swivel blade, and had no trouble peeling the tough skin of the butternut squash. I gave my old peeler to a friend!

Finally, I added fresh parsley to the salad and used oxo's Greensaver Herb Keeper to store the leftover parsley in my fridge. I love that the container is tall and doesn't take up too much space and allows the air to circulate around the herbs which makes them live longer: less money in the garbage!


And now the recipe!


Reprinted  from  Now  &  Again  by  Julia  Turshen  with  permission  by  Chronicle  Books,  2018 
Radicchio  +  Roasted  Squash  Salad 

SERVES  12 

This  salad  is  especially  great  for  the  holiday  not  only  for  its  wonderful  fall  flavors  but  also  because  it’s  hearty  and  can  sit  on  a  buffet  table  for  hours  without  losing  any  integrity  or  flavor.  In  fact,  you  can  mix  the  whole  thing  up  to  a  day  before,  refrigerate  it,  and  then  bring  it  to  room  temperature  before  serving. 

If  you  can  find  delicata  squash,  try  it  (just  seed  it,  no  need  to  peel it).  Note  that  if  you  can’t  find  squash  (or  if  you  dislike  it),  sweet  potatoes  make  an  excellent  substitute. 

3  lb  [1.3  kg]  butternut  squash,  halved  lengthwise,  tough  skin  peeled  and  ends  trimmed  and  discarded,  seeded,  and  cut  into  1-in  [2.5-cm]  pieces 
¾  cup  [180  ml]  olive  oil 
Kosher  salt 
Freshly  ground  black  pepper 
2  Tbsp  Dijon  mustard 
1  Tbsp  honey  or  maple  syrup 
¼  cup  [60  ml]  apple  cider  vinegar 
1  garlic  clove,  minced 
3  heads  radicchio,  each  about  ½  lb  [230  g],  cored  and  thinly  sliced 

Position  one  rack  in  the  center  of  your  oven  and  a  second  rack  in  the  top  third  and  preheat  to  400°F  [200°C].  Line  two  sheet  pans  with  parchment  paper. 

Divide  the  squash  evenly  between  the  prepared  pans,  then  drizzle  each  pan  with  2  Tbsp  of  the  olive  oil  and  season  generously  with  salt  and  pepper.  Use  your  hands  to  toss  everything. 

Roast  the  squash,  stirring  once  or  twice  along  the  way  and  switching  the  pans  between  the  racks  and  rotating  them  back  to  front  halfway  through  the  roasting,  until  softened  and  browned,  about  30  minutes. 

Set  the  squash  aside  to  cool  down  a  bit. 

In  a  large  bowl,  whisk  together  the  mustard,  honey,  vinegar,  and  garlic.  While  whisking  constantly,  slowly  drizzle  in  the  remaining  ½  cup  [120  ml]  olive  oil  to  make  a  dressing.  

Season  to  taste  with  salt  and  pepper.  Add  the  reserved  squash  and  the  radicchio  to  the  bowl  and  use  your  hands  to  combine  everything  gently  (messy,  but  fun). 

Transfer  the  salad  to  a  serving  platter  and  serve  immediately  (or  within  a  few  hours;  it  holds  well  at  room  temperature). 

It’s  Me  Again 
SQUASH  GRILLED  CHEESE 

Make  delicious  vegetarian  sandwiches  by  spreading  mayonnaise  on  both  sides  of  two  slices  of  bread,  top  with  your  favorite  melting  cheese  (such  as  Cheddar  or  Muenster),  and  add  a  large  handful  of  leftover  radicchio  and  squash  salad.  

Close  the  sandwich  and  cook  in  a  skillet until  browned  on  both  sides  and  the  cheese  is  melted,  about  1½  minutes  per  side  (the  mayonnaise  will  help  the  exterior  brown). 


Serve  with  mustard  and  pickles.  See  the  cover  of  the  book  if  you  need  any  convincing!  


This was such an easy recipe to make. I poured the dressing into the oxo squeeze bottle and drizzled it over the salad. That way you can easily store extra dressing in the refrigerator.

I had this salad for breakfast a few days and as part of dinner another night. I added fresh cucumbers and dried cherries to my leftovers!

Thanks oxo for sending me the book and the tools! As always, opinions are my own. I was not paid for this post. 

10/22/18

Apricot & Tangerine Zest Biscotti: Hostess Gift


Are you looking for a perfect hostess gift? Apricot & Tangerine Zest Biscotti are not only easy to make, but make a perfect hostess gift that can be snacked on immediately or saved for a day after the party. Plus, you can make them a day or two ahead.

A few weeks ago I signed up to take Domenica Marchetti's workshop about food preservation on the beautiful Star Bright Farm. This Saturday, I drove to the farm with Domenica the day before the workshop and stayed in the guest house Helen and Mark, the owners of the farm, graciously made available for us. I wanted to bring something as a token of appreciation and decided to make one of Domenica's recipes from Ciao Biscotti (and also bring a bottle of wine). My parents taught me to never ever show up empty-handed.

I adapted Domenica's Orange and Pistachio recipe, but used dried apricots instead of pistachios, tangerine zest instead of orange, and almond extract instead of orange extract. 

This recipe used a new-to-me technique of whipping the egg whites separately, then adding sugar, and only then adding the egg yolks. 

Instead of packing the biscotti in a tin or a bag, I put them in one of my favorite oxo products: POP container!

These were a hit ;)


Apricot & Tangerine Zest Biscotti
Adapted from Ciao Biscotti and reprinted with the permission from the author

Ingredients
1 tablespoon vegetable oil
2 cups unbleached all-purpose flour
1/2 teaspoon baking powder
1/4 teaspoon fine sea salt
2 large egggs, separated
1 tablespoon honey
1 tablespoon olive oil
1 teaspoon almond extract
zest of 3 tangerines
3/4 cups vanilla sugar
1 cup diced dried apricots

Directions (I rewrote them in my own words. Domenica's directions are more thorough!)
1. Preheat the oven to 350F.
2. Oil a large baking sheet.
3. Combine the flour, baking powder, and salt in a medium bowl using a whisk.
4. In a small bowl, whisk together the egg yolks with honey, olive oil, almond extract and tangerine zest.
5. In a large bowl, using a hand mixer, whisk egg whites until foamy. Slowly whisk in the sugar, until the mixture becomes thick, glossy, and sticky.
6. Incorporate the egg yolk mixture into the egg white mixture, and then add the flour mixture and the dried apricots. Using a wooden spoon or a sturdy spatula, mix till all the ingredients are combined.
7. Separate the dough into two parts and form two logs on the baking sheet approximately 2 1/2 inches wide by 12 inches long.
8. Bake the logs for 20 minutes, then gently slide onto a cooling rack using a an offset spatula (I actually used two large fish spatulas) and cool for 20 minutes.
9. Lower oven temperature to 300F.
10. Slice the logs into 1/2 inch pieces and bake for about 8 minutes on each side.
11. Cool biscotti completely before storing in an airtight container.

You can use whichever extract you like and mix in other types of dried fruit or nuts or use a combination of all of the above!

PS No pumpkins were harmed in the makings of the biscotti ;)

8/14/18

Peach Upside-Down Cake from Secrets of the Southern Table by Virginia Willis


At the beginning of this year, I decided to make more recipes that will challenge my culinary skills. This past weekend, I did just that when I baked Peach Upside-Down Cake from Secrets of the Southern Table by Virginia Willis

I've been following Virginia Willis on social media for a while, and bought a ticket to a dinner she hosted in DC as soon as I saw it announced. The dinner was part of her book tour for the newly released Secrets of the Southern Table. I received a preview copy of the book from Virginia's publishers, and as soon as I tried the Peach Upside-Down Cake at dinner, I knew I'd have to make it. 

During the dinner I also tried and loved Virginia's shrimp and grits, but the highlight of the night was hearing about the new cookbook and the stories of Southern cuisine. Virginia researched the book for a year and shares stories of farmers, makers and growers, and immigrants who have impacted the food. You'll learn that Southern cuisine is not just okra, shrimp and grits, and fried chicken. The book includes recipes for dishes such as shredded beef arepas, Mexican chocolate pudding, tomato-ginger green beans, and chicken and butterbean paella.

But let's talk about cake for now!

This was my first time making an upside-down cake, and I was nervous. Would it come out as light and flavorful as Virginia's? Will it stick to the cast iron skillet? Will my friend who came over for her belated birthday celebration like it? Well, I had nothing to worry about.


PEACH UPSIDE-DOWN CAKE from SECRETS OF THE SOUTHERN TABLE by VIRGINIA WILLIS. Copyright © 2018 by VIRGINIA WILLIS. Used by permission of Houghton Mifflin Harcourt. All rights reserved.

Peach Upside-Down Cake
Serves 10

Southern peaches are something special. The trouble is, you pretty much have to live in the South to understand what the fuss is about, because peaches bought elsewhere are most often picked green and hard before shipping. 

When ag-entrepreneur Stephen Rose moved to Nashville in the summer of 2010, he made a disheartening discovery: No one was selling fresh, flavorful peaches like the kind he’d grown up with in Peach County, Georgia. He had an idea. He and his wife bought a 1964 Jeep truck and started selling big, beautiful, juicy Georgia peaches out of their cab in Nashville. Within five weeks, the city had consumed over ten tons of their brown-bagged peaches. Now the Peach Truck Tour travels through Tennessee, Kentucky, Ohio, Indiana, and Pennsylvania!

Pineapple upside-down cake is a Southern classic and is most often made with canned pineapple.

This version uses fresh peaches and is a vast improvement, in my opinion. You can use all-purpose flour instead of the cake flour, but the results will be a bit heavier and slightly dense.

4 medium peaches (about1½ pounds), unpeeled and cut into⅓-inch-thick wedges
Juice of 1 lemon
1 cup cake flour, not self-rising
¾ teaspoon baking powder
¼ teaspoon baking soda
1 cup granulated sugar
10 tablespoons (½ cup plus 2 tablespoons) unsalted butter, at room temperature
1 vanilla bean, split and seeds scraped
2 large eggs
½ cup sour cream

Bourbon Cream (recipe follows)

1.Heat oven to 350ºF. Line a rimmed baking sheet with a silicone baking mat or parchment paper. (This step helps with cleanup.)

2.Toss the peaches with the lemon juice in a large bowl. In a separate bowl, whisk together the flour, baking powder, and baking soda.

3.Cook ¼ cup of the granulated sugar over medium heat in a 10-inch cast-iron skillet, stirring occasionally with a wooden spoon, for 10 minutes, or until the sugar melts and turns a deep amber color. Remove from the heat. Immediately add 2 tablespoons of the butter and stir vigorously. Arrange the peach wedges in concentric circles over the sugar mixture, overlapping them as needed.

4.In the bowl of a stand mixer fitted with the paddle attachment, beat the remaining ¾ cup granulated sugar, ½ cup butter, and vanilla bean seeds on medium speed until smooth. Add the eggs, one at a time, beating until blended after each addition. Add the sour cream and beat until blended. With the mixer running on low speed, gradually add the flour mixture, beating just until blended and stopping to scrape bowl as needed. Spoon the batter over the peaches in the skillet and spread to cover. Place the skillet on the prepared baking sheet.

5.Bake until golden brown and a wooden toothpick inserted into the center of the cake comes out clean, 40 to 45 minutes. Let cool in the skillet on a wire rack for 10 minutes. Run a knife around edge to loosen.

6.Carefully pour out any excess liquid from the skillet into a measuring cup and set aside. (It’s okay if you don’t have any excess liquid—it all depends on how juicy your fruit is.) Carefully invert the cake onto a serving plate and drizzle with any reserved liquid. Let cool slightly, about 10 minutes. Cut into wedges using a serrated knife. Top with bourbon cream and serve immediately.

Bourbon Cream

Makes about 1 cup

½ cup heavy cream
1 tablespoon bourbon


1.Combine the cream and bourbon in a large bowl. Refrigerate, along with a whisk, for at least 15 minutes. Once chilled, beat the cream with the chilled whisk until it holds soft peaks, 3 to 5 minutes.


The recipe was incredibly easy to follow and filled my condo with such a sweet aroma. I used only 3 peaches and vanilla extract instead of vanilla bean. The cake had no trouble coming out of the cast iron skillet and had crispy edges, while remaining tender on the inside.

I did not have bourbon and used orange flavored vodka for the topping ;)

The only downsize of this baking project was the mess I left in my kitchen!

4/13/18

Sunday Supper: Garlicky Turkey & Ricotta Meatballs From Julia Turshen’s Small Victories


Whether you are staying in this Friday the 13th, looking to make a Sunday Supper, or want easy meals to prep for the week, I highly recommend Garlicky Turkey & Ricotta Meatballs From Julia Turshen’s Small Victories. Garlicky is actually not in the title of the official recipe, but that's definitely a very important flavor in the meatballs.

I made these over the weekend because my twin mentioned them, and have eaten them for several meals, shared some, and have a container with these balls in the freezer.

Turkey can be somewhat blah, but with the addition of basil, parsley, garlic, and ricotta, these balls are bursting with flavor and are unbelievably tender. They are also a breeze to make.

The only change I'd make would to beef up the tomato sauce. I followed the recipe, but the sauce wasn't thick enough and could have used more flavor. I suggest you use your own favorite recipe, which can definitely come out of a jar ;)


Yes, meatballs are usually served with spaghetti, but I had mine with a side of roasted potatoes. These would also be awesome on top of mashed potatoes or in a sub.

And as an extra, because you'll have extra ricotta, make Ricotta and Avocado Toasts!

My resolution of making more of other people's recipes is going strong! Let me know if you have a favorite recipe I should try next.

3/12/18

Meatless Monday: Raw Beet Salad With Pistachio Butter, Citrus & Dates


Oh hey, it's another Meatless Monday! I'm barely awake after 4 nights of poor sleep, but have a bright and cheerful (and accidentally VEGAN) recipe to share with you today: Raw Beet Salad With Pistachio Butter, Citrus & Dates.

It all started with a broken arm 4 years ago...that led me to start ordering my produce from Washington's Green Grocer and building a great relationship with Lisa, the company's co-owner. In a very sweet gesture, Lisa sent me a copy of Six Seasons and two frozen pizzas to celebrate our anniversary in my latest produce order. I was very touched!

The first recipe I made from the gorgeous book was an adaptation of Beet Slaw With Pistachios and Raisins.

Here are a few things I changed: I used dates instead of raisins and added citrus segments and diced avocado. 

Look at the gorgeous colors! I recommend julienne'ing the beets instead of grating them for a more appealing look and better texture. I'm not sold on the mint in this salad, and would probably leave it out next time.

Pistachio butter was simple to make and would be great on top of challah or spread on a toast and topped with avocado and sprinkled with salt. 


If you've not given beets a chance yet, do it now!!!

2/20/18

Eggplant Fetteh: Syria Recipes From Home Cookbook


Love eggplant? Then I highly recommend you make Eggplant Fetteh from Syria Recipes From Home Cookbook. That's the latest cookbook featured in the Washington Green Grocer's Cookbook Club.

I made this recipe last week by roasting sliced eggplant in the oven and topping it with yogurt/lemon juice dressing (and adding sumac to it), pomegranate, broken pita chips, cilantro, and pistachios instead of pine nuts.

You really don't need the exact amounts: use as much of each ingredient as you like. Instead of mixing everything in a bowl, I made a big ass plated salad and consumed it in its entirety.

2/1/18

Loaded Baked Potato And Cauliflower Soup From Healthyish With OXO Tools


Just as the weather was starting to warm up a bit, the cold front returned. What's better than a steaming bowl of soup for lunch or dinner? A steaming bowl of soup topped with bacon ;)

My friends from oxo sent me a copy of Healthyish cookbook, which I've already written about, with a variety of oxo tools to make Lindsay's Loaded Baked Potato And Cauliflower Soup. {Disclaimer: the book and the tools were a gift. I am not compensated in any way for this blog post. All opinions are my own as always!}

Although my kitchen is pretty well stocked, it's always fun to get new tools to play with. Also, I gave the older versions of these tools to my friend Emily. Win/win!

Pro 8" Chef's Knife - So sharp!! I think everyone needs a chef's knife, and this one did a great job cutting through large potatoes and cauliflower; plus, it's made in Germany, which is a good thing in my book when it comes to kitchen tools.

12" Tongs - perfect for taking out strips of bacon from the pan or reaching out to the top shelf of your cabinet to grab a bag of snacks.

Wooden Corner Spoon - who doesn't need an extra wooden spoon? This one has a straight side, which makes it easier to reach into the corners of your pots and pans.

Coarse Grater - perfect for any cheese or vegetable!

Swivel Peeler - cushioned handle with an extra sharp blade! This peeler handled Russet potatoes as if they were butter. 

Kitchen and Herb Scissors - my favorite part about these is that you can take them apart for ease of cleaning or to sharpen.


And now for the soup!!!

Loaded Baked Potato and Cauliflower Soup
Makes 12 cups; serves 4 to 6

True or false? The best part of a baked potato is the toppings. If you agree, then this soup is perfect for you. Starting off with bacon fat means that the entire soup is infused with delicious, smoky flavor. And, instead of just using starch-heavy potatoes, a blend of potato and cauliflower makes for a creamier, lighter soup. All this as balance for the classic baked potato toppings, naturally.

INGREDIENTS
4 large slices (8 oz/225 g) extra-thick cut bacon
2 onions (12 oz/340 g), chopped (about 2 cups)
Kosher salt and freshly ground black pepper
2 large russet potatoes (2 lbs/910 g), peeled and cut into 1/2-inch (12-mm) pieces (about 5 cups)
1 medium head cauliflower (1 ¼ lbs/570 g), cut into small florets (about 6 cups)
8 cups (2 L) chicken stock or vegetable stock
Sour cream, chopped fresh chives, and grated Cheddar cheese, for serving

HOW TO MAKE IT
Heat a large soup pot over medium-low heat. Place the bacon slices flat in the pot and cook, turning a couple times, until crispy and most of the fat has drained from the bacon, 8 to 12 minutes total. Using tongs, transfer the bacon to a paper towel–lined plate, leaving the fat in the pot.
Add the onions, 2 teaspoons salt, and 1 teaspoon pepper. Cook, stirring often, until the onions are translucent and soft, 10 to 12 minutes.
Stir in the potatoes, cauliflower, and stock, cover, and bring to a boil over high heat. Reduce to a strong simmer and cook, stirring here and there, until the potatoes are very soft, 15 to 20 minutes.
Purée the soup, using a blender in batches or a handheld immersion blender. Taste and season with additional salt and pepper, if you like.

Slice or tear the cooked bacon into bite- size pieces and sprinkle it over bowls of the soup. Serve topped with sour cream, chives, and cheese.

The only changes I made to the recipe were 1) using scallions because my store did not have chives, 2) using an immersion blender, and 3) adding a bit of cayenne powder in the end.

The soup is comforting and filling and is great for leftovers the next day. My friend Emily came over for dinner with her boyfriend Cal and we paired the soup with epic grilled cheese sandwiches cooked on a panini grill with onions, ham and tomatoes! SO good. The onions Emily cooked in leftover bacon from from the extra bacon I cooked for the soup ;)